<UserControl x:Class="VistaTreeView.Page"
xmlns="http://schemas.microsoft.com/winfx/2006/xaml/presentation"
xmlns:x="http://schemas.microsoft.com/winfx/2006/xaml"
xmlns:liquidTreeView="clr-namespace:Liquid;assembly=Liquid.TreeView"
Width="400" Height="400">
<Grid x:Name="LayoutRoot" Background="White" VerticalAlignment="Top" HorizontalAlignment="Left">
<Grid.Resources>
<Style x:Name="VistaLiquidExpand" TargetType="liquidTreeView:Expand">
<Setter Property="Template">
<Setter.Value>
<ControlTemplate TargetType="liquidTreeView:Expand">
<Grid x:Name="RootElement" Background="#00ffffff" RenderTransformOrigin="0.5,0.5">
<Grid.Resources>
<Storyboard x:Name="ElementRotate" BeginTime="0">
<DoubleAnimation Storyboard.TargetName="ElementChildrenRotate" Storyboard.TargetProperty="Angle" From="0.0" To="359.0" Duration="0:0:0.5" RepeatBehavior="Forever"/>
<DoubleAnimation Storyboard.TargetName="ElementBackground" Storyboard.TargetProperty="StrokeThickness" From="1.0" To="2.5" Duration="0:0:0.4" RepeatBehavior="Forever" AutoReverse="True"/>
</Storyboard>
<Storyboard x:Name="ElementMouseHover" BeginTime="0">
<DoubleAnimation Storyboard.TargetName="ElementChildrenScale" Storyboard.TargetProperty="ScaleX" From="1.0" To="1.2" Duration="0:0:0.1" />
<DoubleAnimation Storyboard.TargetName="ElementChildrenScale" Storyboard.TargetProperty="ScaleY" From="1.0" To="1.2" Duration="0:0:0.1" />
</Storyboard>
<Storyboard x:Name="ElementMouseLeave" BeginTime="0">
<DoubleAnimation Storyboard.TargetName="ElementChildrenScale" Storyboard.TargetProperty="ScaleX" From="1.2" To="1.0" Duration="0:0:0.1" />
<DoubleAnimation Storyboard.TargetName="ElementChildrenScale" Storyboard.TargetProperty="ScaleY" From="1.2" To="1.0" Duration="0:0:0.1" />
</Storyboard>
</Grid.Resources>
<Grid.RenderTransform>
<TransformGroup>
<RotateTransform x:Name="ElementChildrenRotate" Angle="0" />
<ScaleTransform x:Name="ElementChildrenScale" ScaleX="1" ScaleY="1" />
</TransformGroup>
</Grid.RenderTransform>
<Rectangle x:Name="ElementBackground" Visibility="Collapsed" />
<Polygon x:Name="ElementMinus" Points="8,3 8,8 3,8 8,3" Fill="#ff595959" Stroke="#ff262626" StrokeThickness="1" />
<Polygon x:Name="ElementPlus" Points="3,3 7,7 3,11 3,3" Fill="#ffffffff" Stroke="#ffa5a5a5" StrokeThickness="1" />
</Grid>
</ControlTemplate>
</Setter.Value>
</Setter>
</Style>
<Style x:Name="VistaLiquidNode" TargetType="liquidTreeView:Node">
<Setter Property="Template">
<Setter.Value>
<ControlTemplate TargetType="liquidTreeView:Node">
<StackPanel x:Name="RootElement" Orientation="Vertical" Background="{TemplateBinding Background}">
<StackPanel.Resources>
<Storyboard x:Name="ElementFadeIn" BeginTime="0">
<DoubleAnimation Storyboard.TargetName="ElementChildren" Storyboard.TargetProperty="Opacity" From="0.0" To="1.0" Duration="0:0:0.2"/>
<DoubleAnimation Storyboard.TargetName="ElementChildrenScale" Storyboard.TargetProperty="ScaleX" From="0.0" To="1.0" Duration="0:0:0.2"/>
<DoubleAnimation Storyboard.TargetName="ElementChildrenScale" Storyboard.TargetProperty="ScaleY" From="0.0" To="1.0" Duration="0:0:0.2"/>
</Storyboard>
</StackPanel.Resources>
<Grid x:Name="ElementGrid">
<Grid.ColumnDefinitions>
<ColumnDefinition Width="16" MaxWidth="16" />
<ColumnDefinition Width="0" />
<ColumnDefinition Width="18" MaxWidth="18" />
<ColumnDefinition />
</Grid.ColumnDefinitions>
<Rectangle x:Name="ElementBackgroundHover" Grid.Row="0" Grid.Column="3" Margin="0 0 0 1" HorizontalAlignment="Stretch" VerticalAlignment="Stretch" StrokeThickness="1" Stroke="#d8f0fa" RadiusX="2" RadiusY="2" Visibility="Collapsed">
<Rectangle.Fill>
<LinearGradientBrush StartPoint="0.5,0" EndPoint="0.5,1">
<GradientStop Color="#f8fcfe" Offset="0.0" />
<GradientStop Color="#e8f5fd" Offset="1.0" />
</LinearGradientBrush>
</Rectangle.Fill>
</Rectangle>
<Rectangle x:Name="ElementBackground" Grid.Column="3" HorizontalAlignment="Stretch" VerticalAlignment="Stretch" Margin="0 0 0 1" StrokeThickness="1" Stroke="#99defd" RadiusX="2" RadiusY="2" Visibility="Collapsed">
<Rectangle.Fill>
<LinearGradientBrush StartPoint="0.5,0" EndPoint="0.5,1">
<GradientStop Color="#f6fbfd" Offset="0.0" />
<GradientStop Color="#d5effc" Offset="0.9" />
<GradientStop Color="#e7f5fd" Offset="0.9" />
<GradientStop Color="#e7f5fd" Offset="1.0" />
</LinearGradientBrush>
</Rectangle.Fill>
</Rectangle>
<Canvas Grid.Column="0" Grid.RowSpan="2" HorizontalAlignment="Left" VerticalAlignment="Top">
<Line x:Name="ElementVerticalLine" Stroke="Black" StrokeThickness="0.5" StrokeDashArray="0,1,2,3" StrokeDashOffset="5" StrokeDashCap="Square" />
</Canvas>
<Line x:Name="ElementHorizontalLine" Grid.Column="0" HorizontalAlignment="Left" VerticalAlignment="Top" Stroke="Black" StrokeThickness="0.5" StrokeDashArray="0,1,2,3" StrokeDashOffset="5" StrokeDashCap="Square" />
<liquidTreeView:Expand x:Name="ElementExpand" Grid.Column="0" HorizontalAlignment="Left" Style="{StaticResource VistaLiquidExpand}" />
<CheckBox x:Name="ElementCheckbox" Grid.Column="1" HorizontalAlignment="Left" VerticalAlignment="Center" />
<ContentControl x:Name="ElementIcon" Grid.Column="2" HorizontalAlignment="Left" VerticalAlignment="Center" />
<TextBox x:Name="ElementInput" Grid.Column="3" HorizontalAlignment="Left" FontFamily="{TemplateBinding FontFamily}" FontSize="{TemplateBinding FontSize}" Padding="1" Visibility="Collapsed" BorderThickness="0.5" />
<TextBlock x:Name="ElementText" Grid.Column="3" Margin="3 1 4 2" HorizontalAlignment="Left" VerticalAlignment="Center" Text="" FontFamily="{TemplateBinding FontFamily}"
FontSize="{TemplateBinding FontSize}" FontWeight="{TemplateBinding FontWeight}"
FontStyle="{TemplateBinding FontStyle}" Foreground="{TemplateBinding Foreground}"/>
<TextBlock x:Name="ElementSelectedText" Grid.Column="3" Margin="3 1 4 2" HorizontalAlignment="Left" VerticalAlignment="Center" Text="" FontFamily="{TemplateBinding FontFamily}"
FontSize="{TemplateBinding FontSize}" FontWeight="{TemplateBinding FontWeight}"
FontStyle="{TemplateBinding FontStyle}" Foreground="#000000" Visibility="Collapsed" />
</Grid>
<StackPanel x:Name="ElementChildren" Orientation="Vertical" HorizontalAlignment="Left" Margin="16 0 0 0" Background="#00ffffff" Opacity="0" Visibility="Collapsed">
<StackPanel.RenderTransform>
<ScaleTransform x:Name="ElementChildrenScale" />
</StackPanel.RenderTransform>
</StackPanel>
</StackPanel>
</ControlTemplate>
</Setter.Value>
</Setter>
</Style>
</Grid.Resources>
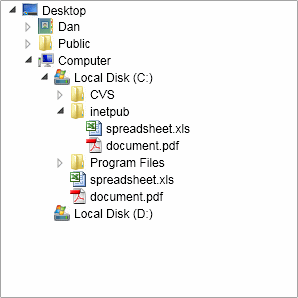
<liquidTreeView:Tree x:Name="testTree" Canvas.Top="295" Canvas.Left="200" Width="300" Height="300" Margin="4" Populate="Tree_Populate" NodeClick="Tree_NodeClick" />
</Grid>
</UserControl>
 You need to login to Download the Vista TreeView example, If you do not have a login you can register for free!