Enabling Drag and Drop
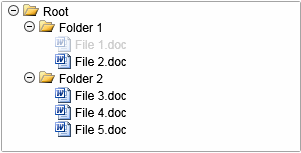
Here we have a simple tutorial to demonstrate the drag and drop functionality of the TreeView control. In this example we have 2 folders containing 5 files. When using the Liquid TreeView if you wish to use the drag and drop feature you must be using icons for your nodes you wish to drag. This is essential as to drag a node you do so by clicking the node icon and drag the node to it's destination.
 You need to login to Download the Drag and Drop TreeView example, If you do not have a login you can register for free!
Here is the XAML for this demonstration:
In the XAML we define 2 folder nodes which contain several child document nodes. The important attributes in the XAML are EnableDragAndDrop="true" and Drop="Tree_Drop". The first ensures dragging and dropping is enabled and the second is the name of an event handler we have declared in the C# code behind file which allows you specify where the node is positioned or whether the Drop operation should be cancelled.
In this event handler you can instruct the TreeView to insert the node before or after the node under the cursor. Or if you like the node can be appended as a child of the node under the cursor, either as the first or last child. It is also possible to cancel the drop operation by setting e.Cancel = true, this allows for a lot of flexibility in your Silverlight apps.
Guide the car to its parking space in this fun Car Parking game.

Aim for the Trash Can and get the various items of Trash in the bin.
Fly your plane in this colorful vertical scrolling shoot-em-up. Blast the bad guys and collect any bonus's they leave behind.
Pop as many bubbles as possible in this fun and colorful bubble popping game. The levels start off easy enough but gradually get harder!
Here we have a bunch of monsters that need to be matched up. Look out for the bomb and spinning monsters that will cause special damage!

Guide your friendly Bird through the maze of pipes and other obstacles collecting the Stars in this cool arcade game inspired by the legendary Flappy Bird.
You are stranded on an Alien planet. Your goal is to build a space rocket and escape. Start by building units to create power and mine the metal patches. Build defenses to defend your base from the advancing Aliens and Zombies!

Play Pool against the computer or battle against your friends in the online mode!
Slice the fruit that is thrown up onto the screen. Slice the fruit into multiple pieces for maximum points!